Bun: Revolutionizing JavaScript Development — An In-Depth Guide with Real-World Examples
The hype surrounding something called "Bun" is rapidly growing. But how many of us actually know what Bun is? Perhaps only a few. Let's explore it more deeply with examples in this blog post. Before diving into Bun, let's first delve into the history of previous technology.
History
Back in 2008, JavaScript was the scripting language used to create website frontends and handle events. In 2009, Ryan Dahl replaced this and introduced NodeJs. The introduction of NodeJs made it possible for developers to write JavaScript not only on the client-side (frontend) but also on the server-side (backend). NodeJs was a revolutionary runtime environment, but it came with many defects, some of which still exist today. These defects include:
1. Legacy Issues with Security
2. API Compatibility and Tooling
3. Module Management
To address these issues, Ryan Dahl introduced Deno in 2020 AD. Deno, a remix of "noDE," addressed all the above issues and defects of NodeJs. However, there are common problems in both NodeJs and Deno, such as speed and versioning issues, among others.
For addressing both the problems of NodeJs and Deno, and due to frustration with the speed of NodeJs while developing a NextJs project, Jarred Summer introduced Bun in 2022.
What is Bun?
After looking at the history above, we can say that Bun is a replacement for runtime environments like NodeJs and Deno. Besides being a runtime environment, it also serves as a replacement for package managers like npm and yarn. Furthermore, it handles bundling and testing. So, we can say that Bun is an all-in-one package for runtime, package management, bundling, and testing.
In terms of technical details, both NodeJs and Deno were based on the V8 JavaScript Engine. If you're unfamiliar with the V8 JavaScript Engine, let me give you a brief introduction. The V8 JavaScript engine is an open-source, high-performance web assembly and JS engine developed in C++. It is used by Google, NodeJs, and Deno.
In contrast to the V8 JavaScript Engine, Bun runs on the JavaScript Core Engine, which is also open source and developed by Apple. Bun was developed using the Zig programming language, which can work at a low level, manage memory manually, and support native threading and concurrency.
Similarities with NodeJs
Bun also has web APIs similar to NodeJs, including fetch, JSON, websockets, url, blob, path, http, util, dns, __dirname, __filename, and more.
Some Friendly Command Replacements
- npx is replaced with bunx.
- npm init is replaced with bun init.
- npm install packageName is replaced with bun add packageName.
Let’s Go Practical Now: How to Install Bun
For now, Bun can only be installed on Linux and macOS, with an experimental version available for Windows. There are several ways to install Bun, such as:
curl https://bun.sh/install | bash
npm i -g bun
docker pull oven/bun
docker run -rm -init -ulimit memlock=-1:-1 oven/bun
For uninstallation, you can use:
rm -rf ~/.binAfter this command, you need to update .bashrc/.zshrc to remove references to ~/.bun/bin from the PATH variable as well.
Setting up Wsl On Windows
Note : You system should be running Windows 10 version 2004 and higher (Build 19041 and higher) or Windows 11
In this blog post, we assume we have a Windows machine and are installing Bun on WSL (Windows Subsystem for Linux) using curl. If you don’t have WSL on your system, you can follow the steps outlined in the image above.

By default, Ubuntu will be installed. Once installed, restart your system, create a user and password as prompted, and you are ready to install Bun.

Initializing Bun Project
Now that Bun is installed on our system, let’s create a project in Bun, similar to how we would create one in NodeJs. Almost everything is the same. We created a “learningBun” folder where all our code will be. We ran “bun init” to initialize our project, just like you would do “npm init” or “yarn init” in NodeJs. By default, Bun creates projects in TypeScript.
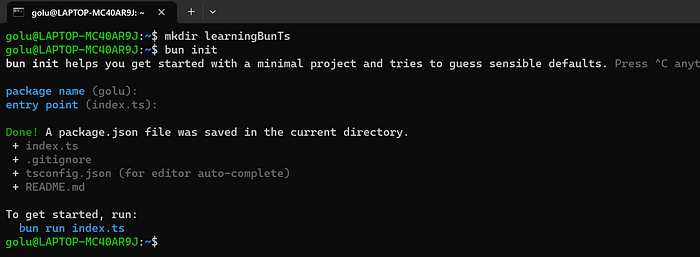
If you want JS which we will be using in this blog post, you type the fileName with .js extension in the entry point like below to create project on JS.

Now let’s take a look at our project by opening it in Visual Studio Code (VSCode).
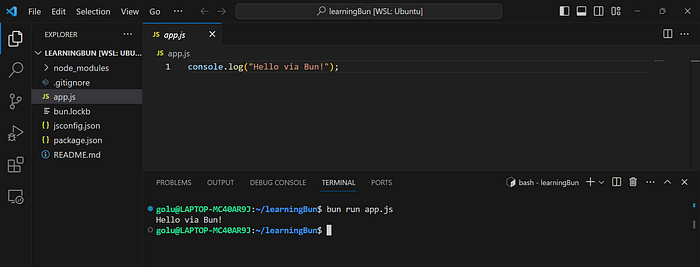
In the images above, all the folders and files are provided by Bun by default. We simply opened our terminal and ran “bun run app.js” to start/run our project. “app.js” is the main file, so “bun run mainFile” should be provided.
Simple Get API in Bun
Next, let’s see how to create a simple GET API in Bun.

The output in the browser is as follows. We will dive deeper into this code later, but for now, understand that it opens port 4000 on our system and displays a response message on the request.

Trying ExpressJs in Bun
Now, let’s try the same thing using Express.js. In the next blog post, we will use Elysia.js, but for now, let’s see how we can use Express.js in our Bun project.
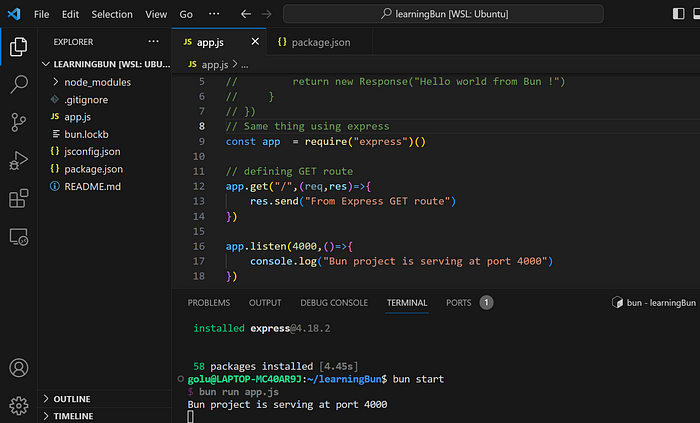
To install Express, we can use the following command: “bun add express.”
Alias Command In Scripts(package.json) in Bun
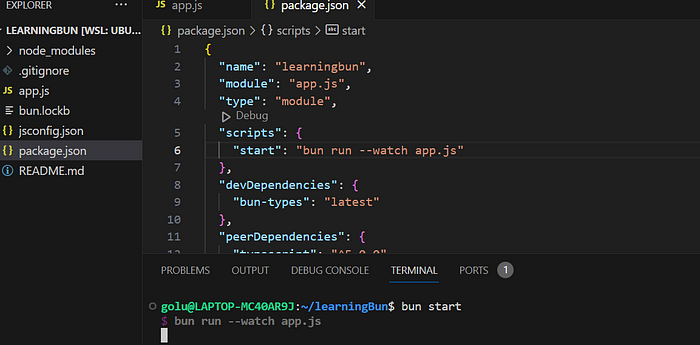
You can see the “bun start” command in the terminal. Don’t worry; just like in NodeJs, you can give an alias to some commands in the package.json file.
Use the — watch flag to automatically restart our server after any changes. We talked about this flag earlier.
Output:

Accessing Environment Variables in Bun
Now, let’s try to access environment variables in Bun without third-party packages. In the .env file, I have placed “name=Manish.” You can access this using either “process.env.name” or “Bun.env.name.”

